Tutorial
Let's consider the application of Feature-Sliced Design on the example of TodoApp
- At first, we will prepare application basely (bootstrap, routing, styles)
- Then we will consider - how the concepts of the methodology help flexibly and effectively design business logic without unnecessary costs
There is codesandbox-insert with the final solution, which can help to clarify the implementation details at the end of the article
Stack: React, Effector, TypeScript, Sass, AntDesign
The tutorial is designed to reveal the practical idea of the methodology itself. Therefore, the practices described here are largely suitable for other technological stacks of frontend projects
1. Preparation
1.1 Initializing the project
At the moment, there are many ways to generate and run a project template
We will not focus too much on this step, but for quick initialization, you can use CRA (for React):
$ npx create-react-app todo-app --template typescript
1.2 Preparing the structure
We received the following blank for the project
└── src/
    ├── App.css
    ├── App.test.tsx
    ├── App.tsx
    ├── index.css
    ├── index.ts
    ├── logo.svg
    ├── react-app-env.d.ts
    ├── reportWebVitals.ts
    ├── setupTests.ts
    └── index.tsx/
How it usually happens
And usually most projects at this stage turn into something like this:
└── src/
    ├── api/
    ├── components/
    ├── containers/
    ├── helpers/
    ├── pages/
    ├── routes/
    ├── store/
    ├── App.tsx
    └── index.tsx/
They can become such immediately, or after a long development
At the same time, if we look inside we will most likely find:
- Highly coupled directories by nesting
- Strongly connected components with each other
- A huge number of dissimilar components / containers in their respective folders, linked thoughtlessly
How can it be done otherwise
Anyone who has been developing frontend projects for at least a long time understands the advantages and disadvantages of this approach.
However, most frontend projects are still something like this, since there is no proven flexible and extensible alternative
Multiply this by the free adaptations of the structure for each project, without a ban from the framework-and we get "projects as unique as snowflakes"
The purpose of this tutorial is to show a different view of the usual practices in designing
Adapting the structure to the desired view
└── src/
    ├── app/                    # Initializing application logic
    |    ├── index.tsx          #    Entrypoint for connecting the application (formerly App. tsx)
    |    └── index.css          #    Global application styles
    ├── pages/                  #
    ├── widgets/                #
    ├── features/               #
    ├── entities/               #
    ├── shared/                 #
    └── index.tsx               # Connecting and rendering the application
At first glance the structure may seem strange, but over time you will notice that you use familiar abstractions, but in a consistent and ordered form.
Also, we enable support for absolute imports for convenience
{
  "compilerOptions": {
    "baseUrl": "./src",
    // Or aliases, if it's more convenient
Here's how it will help us in the future
- import App from "../app"
- import Button from "../../shared/ui/button";
+ import App from "app"
+ import Button from "shared/ui/button";
Layers: app
As you can see , we have moved all the basic logic to the app/ directory
It is there, according to the methodology, that all the preparatory logic should be placed:
- connecting global styles (
/app/styles/**+/app/index.css) - providers and HOCs with initializing logic (
/app/providers/**)
For now, we will transfer all the existing logic there, and leave the other directories empty, as in the diagram above.
import "./index.css";

const App = () => {...}
1.3 Enabling global styles
Install dependencies
In the tutorial, we install sass, but you can also take any other preprocessor that supports imports
$ npm i sass
Creating files for styles
For css variables
:root {
    --color-dark: #242424;
    --color-primary: #108ee9;
    ...
}
To normalize styles
html {
    scroll-behavior: smooth;
}
...
Connecting all styles
@import "./normalize.scss";
@import "./vars.scss";
...
@import "./styles/index.scss";
...
import "./index.scss"

const App = () => {...}
1.4 Adding routing
Install dependencies
$ npm i react-router react-router-dom compose-function
$ npm i -D @types/react-router @types/react-router-dom @types/compose-function
Add HOC to initialize the router
import { Suspense } from "react";
import { BrowserRouter } from "react-router-dom";

export const withRouter = (component: () => React.ReactNode) => () => (
    <BrowserRouter>
        <Suspense fallback="Loading...">
            {component()}
        </Suspense>
    </BrowserRouter>
);
import compose from "compose-function";
import { withRouter } from "./with-router";

export const withProviders = compose(withRouter);
import { withProviders } from "./providers";
...

const App = () => {...}

export default withProviders(App);
Let's add real pages
This is just one of the routing implementations
- You can declare it declaratively or through the list of routes (+ react-router-config)
- You can declare it at the pages or app level
The methodology does not yet regulate the implementation of this logic in any way
Temporary page, only for checking the routing
You can delete it later
const TestPage = () => {
    return <div>Test Page</div>;
};

export default TestPage;
Let's form the routes
// Or use @loadable/component, as part of the tutorial - uncritically
import { lazy } from "react";
import { Route, Routes, Navigate } from "react-router-dom";

const TestPage = lazy(() => import("./test"));

export const Routing = () => {
    return (
        <Routes>
            <Route path="/" element={<TestPage/>} />
            <Route path="*" element={<Navigate to="/" />} />
        </Routes>
    );
};
Connecting the routing to the application
import { Routing } from "pages";

const App = () => (
    // Potentially you can insert here
    // A single header for the entire application
    // Or do it on separate pages
    <Routing />
)
...
Layers: app, pages
Here we used several layers at once:
app- to initialize the router (HOC: withRouter)pages- for storing page modules
1.5 Let's connect UIKit
To simplify the tutorial, we will use the ready-made UIKit from AntDesign
$ npm i antd @ant-design/icons
But you can use any other UIKit or create your own by placing the components in shared/ui - this is where it is recommended to place UIKit of application:
import { Checkbox } from "antd"; // ~ "shared/ui/checkbox"
import { Card } from "antd"; // ~ "shared/ui/card"
2. Implementing business logic
We will try to focus not on the implementation of each module, but on their sequential composition
2.1 Let's analyze the functionality
Before starting the code, we need to decide - what value we want to convey to the end user
To do this, we decompose our functionality by responsibility scopes (layers)
Pages
We will outline the basic necessary pages, and user expectations from them:
-
TasksListPage- the "Task List" page- View the task list
- Go to the page of a specific task
- Mark a specific task completed/unfulfilled
- Set filtering by completed / unfulfilled tasks
-
TaskDetailsPage- page "Task card"- View information about the task
- Mark a specific task as completed/unfulfilled
- Go back to the task list
Each of the described features is a part of the functionality
Usual approach
And there is a great temptation
- or implement all the logic in the directory of each specific page.
- or put all" possibly reused "modules in the shared folder
src/componentsor similar
But if such a solution would be suitable for a small and short-lived project, then in real corporate development, it can put an end to the further development of the project, turning it into "another dense legacy"
This is due to the usual conditions of the project development:
- requirements change quite often
- there are new circumstances
- the technical debt is accumulating every day and it is becoming more difficult to add new features
- it is necessary to scale both the project itself and its team
Alternative approach
Even with the basic partitioning, we see that:
- there are common entities between the pages and their display (Task)
- there are common features between the pages (Mark the task completed / unfulfilled)
Accordingly, it seems logical to continue to decompose the task, but already based on the above-mentioned features for the user.
Features
Parts of functionality that bring value to the user
<ToggleTask />- (component) Mark a task as completed / unfulfilled<TasksFilters/>- (component) Set filtering for the task list
Entities��
Business entities on which a higher-level logic will be built
<TaskCard />- (component) Task card, with information displaygetTasksListFx({ filters })- (effect) Loading the task list with parametersgetTaskByIdFx(taskId: number)- (effect) Uploading a task by ID
Shared
Reused shared modules, without binding to the domain scopes
<Card />- (component) UIKit component- At the same time, you can either implement your own UIKit for the project, or use a ready-made one
getTasksList({ filters })- (api) Loading the task list with parametersgetTaskById(taskId: number)- (api) Loading a task by ID
What is the profit?
Now all modules can be designed with low coupling and with their own scope of responsibility, as well as distributed across the team without conflicts during development
And most importantly, now each module serves to build a specific business value, which reduces the risks for creating "features for the sake of features"
2.2 What else is worth remembering
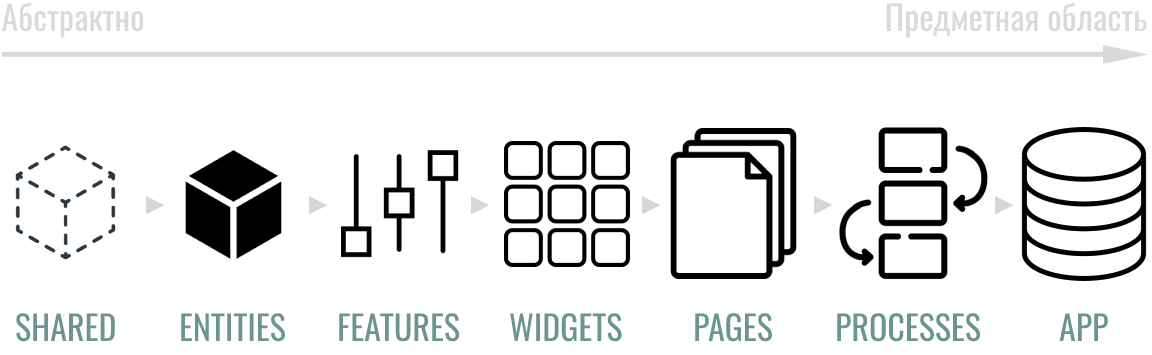
Layers and responsibilities
As described above, thanks to the layered structure, we can predictably distribute the complexity of the application according to scopes of responsibility, i.e. layers.
At the same time, a higher-level logic is built on the basis of the underlying layers:
// (shared)         => (entities)  + (features)     => (pages)
<Card> + <Checkbox> => <TaskCard/> + <ToggleTask/>  => <TaskPage/>
Preparing modules for use
Each implemented module must provide its own public interface for use:
export { Card as FooCard, Thumbnail as FooThumbnail, ... } from "./ui";
export * as fooModel from "./model";
If you need named namespace exports for the Public API declaration, you can look aside @babel/plugin-proposal-export-namespace-from
Or, as an alternative, use a more detailed design
import { Card as FooCard, Thumbnail as FooThumbnail, ... } from "./ui";
import * as fooModel from "./model";

export { FooCard, FooThumbnail, fooModel };
2.3 Let's display the basic task list
(entities) Task card
import { Link } from "react-router-dom";
import cn from "classnames"; // we can safely use the analogy
import { Row } from "antd"; // ~ "shared/ui/row"

export const TaskRow = ({ data, titleHref }: TaskRowProps) => {
    return (
        <Row className={cn(styles.root, { [styles.completed]: data.completed })}>
            {titleHref ? <Link to={titleHref}>{data.title}</Link> : data.title}
        </Row>
    )
}
(entities) Loading the task list
You can split it by the type of entity, or store everything in the duck-modular style
For more information about the implementation of the API according to the tutorial, see here
import { createStore, combine, createEffect, createEvent } from "effector";
import { useStore } from "effector-react";

import { typicodeApi } from "shared/api";
import type { Task } from "shared/api";

// Each effect can also have its own additional. processing
const getTasksListFx = createEffect((params?: typicodeApi.tasks.GetTasksListParams) => {
  // There may also be an additional processing the effect
  return typicodeApi.tasks.getTasksList(params);
});

// Can also be stored in a normalized form
export const $tasks = createStore<Task[]>([])
  .on(getTasksListFx.doneData, (_, payload) => ...)

export const $tasksList = combine($tasks, (tasks) => Object.values(tasks));
// You can also add other things like `isEmpty`, `isLoading`, ...
(pages) Let's connect all the logic on the page
import { useEffect } from "react";
// If you feel confident with @effector/reflect - can use it
// Within the tutorial non-critical
import { useStore } from "effector";
import { Layout, Row, Col, Typography, Spin, Empty } from "antd"; // ~ "shared/ui/{...}"

import { TaskRow, taskModel } from "entities/task";
import styles from "./styles.module.scss";

const TasksListPage = () => {
  const tasks = useStore(taskModel.$tasksList);
  const isLoading = useStore(taskModel.$tasksListLoading);
  const isEmpty = useStore(taskModel.$tasksListEmpty);

  /**
   * Requesting data when loading the page
   * @remark is a bad practice in the effector world and is presented here-just for a visual demonstration
   * It is better to fetch via event.pageMounted or reflect
   */
  useEffect(() => taskModel.getTasksListFx(), []);

  return (
    <Layout className={styles.root}>
      <Layout.Toolbar className={styles.toolbar}>
        <Row justify="center">
          <Typography.Title level={1}>Tasks List</Typography.Title>
        </Row>
        {/* TODO: TasksFilters */}
      </Layout.Toolbar>
      <Layout.Content className={styles.content}>
        <Row gutter={[0, 20]} justify="center">
          {isLoading && <Spin size="large" />}
          {!isLoading && tasks.map((task) => (
            <Col key={task.id} span={24}>
              <TaskRow
                data={task}
                titleHref={`/${task.id}`}
                // TODO: ToggleTaskCheckbox
              />
            </Col>
          ))}
          {!isLoading && isEmpty && <Empty description="No tasks found" />}
        </Row>
      </Layout.Content>
    </Layout>
  );
};
2.4 Adding task status switching
(entities) Switching the task status
export const toggleTask = createEvent<number>();

export const $tasks = createStore<Task[]>(...)
  ...
  .on(toggleTask, (state, taskId) => produce(state, draft => {
    const task = draft[taskId];
    task.completed = !task.completed;
    console.log(1, { taskId, state, draft: draft[taskId].completed });
  }))


// We make a hook to get involved in updates react
// @see In the case of effector, using a hook is an extreme measure, since computed stores are more preferable
export const useTask = (taskId: number): import("shared/api").Task | undefined => {
  return useStoreMap({
    store: $tasks,
    keys: [taskId],
    fn: (tasks, [id]) => tasks[id] ?? null
  });
};
(features) Checkbox for the task
import { Checkbox } from "antd"; // ~ "shared/ui/checkbox"
import { taskModel } from "entities/task";

// resolve / unresolve
export const ToggleTask = ({ taskId }: ToggleTaskProps) => {
    const task = taskModel.useTask(taskId);
    if (!task) return null;

    return (
        <Checkbox
            onClick={() => taskModel.toggleTask(taskId)}
            checked={task.completed}
        />
    )
}
(pages) Embedding the checkbox in the page
What is noteworthy is that the task card does not know at all about the page where it is used, nor about what action buttons can be inserted into it (the same can be said about the feature itself)
This approach allows you to simultaneously competently share responsibility and flexibly reuse logic during implementation
import { ToggleTask } from "features/toggle-task";
import { TaskRow, taskModel } from "entities/task";
...
<Col key={task.id} span={24}>
      <TaskRow
        ...
        before={<ToggleTask taskId={task.id} withStatus={false} />}
      />
</Col>
2.5 Adding task filtering
(entities) Filtering at the data level
import { combine, createEvent, createStore } from "effector";

export type QueryConfig = { completed?: boolean };

const setQueryConfig = createEvent<QueryConfig>();

// Can be moved to a separate directory (for storing multiple models)
export const $queryConfig = createStore<QueryConfig>({})
  .on(setQueryConfig, (_, payload) => payload);

/**
 * Filtered Tasks
 * @remark Can be handled at the effects level - but then you need to connect additional logic to the store
 * > For example, hide / show the task at the `toggleTask` event
 */
export const $tasksFiltered = combine(
  $tasksList,
  $queryConfig,
  (tasksList, config) => {
    return tasksList.filter(task => (
      config.completed === undefined ||
      task.completed === config.completed
  ))},
);
(features) UI controls for filters
// If you feel confident with @effector/reflect, you can immediately use it
// As part of tutorial uncritically
import { useStore } from "effector";
import { Radio } from "antd"; // ~ "shared/ui/radio"

import { taskModel } from "entities/task";
import { filtersList, getFilterById, DEFAULT_FILTER } from "./config";

export const const TasksFilters = () => {
  const isLoading = useStore($tasksListLoading);

  return (
    <Radio.Group defaultValue={DEFAULT_FILTER} buttonStyle="solid">
      {filtersList.map(({ title, id }) => (
        <Radio.Button
          key={id}
          onClick={() => taskModel.setQueryConfig(getFilterById(id).config)}
          value={id}
          disabled={isLoading}
        >
          {title}
        </Radio.Button>
      ))}
    </Radio.Group>
  );
};
(pages) Implementing filtering in the page
And we implemented the logic again, without asking too many questions:
- And where to put the filtering logic?
- Can these filters be reused in the future?
- Can filters know about the page context?
We just divided the logic according to the scopes of responsibility (layers)
import { TasksFilters } from "features/tasks-filters";
...
<Layout.Toolbar className={styles.toolbar}>
    ...
    <Row justify="center">
        <TasksFilters />
    </Row>
</Layout.Toolbar>
At the current stage, such a division may seem superfluous - "Why not put everything at once at the page / feature level"?
But then let's try to ask questions ourselves:
- Where are the guarantees that the complexity of the page will not increase in the future so much that all aspects of logic will be strongly intertwined? How can I add new functionality at no extra cost?
- Where are the guarantees that a new person who has joined the team (or even you, if you leave the project for six months) will understand what is happening here?
- How to build logic so as not to disrupt the data flow / reactivity with other features?
- What if this filtering logic is so strongly attached to the context of the page that it will be impossible to use it on other pages?
This is why we divide the responsibility so that each layer is engaged in only one task, and so that each of the developers understands this
2.6 Task Page
We implement the task page in the same way:
- We highlight the shared logic
- We highlight the entities logic
- We highlight the features logic
- We highlight the pages logic
(pages) The"Task Card" page
import { ToggleTask } from "features/toggle-task";
import { TaskCard, taskModel } from "entities/task";
import { Layout, Button } from "antd"; // ~ "shared/ui/{...}"
import styles from "./styles.module.scss";

const TaskDetailsPage = (props: Props) => {
    const taskId = Number(props.match?.params.taskId);
    const task = taskModel.useTask(taskId);
    const isLoading = useStore(taskModel.$taskDetailsLoading);

  /**
   * Requesting data on the task
   * @remark is a bad practice in the effector world and is presented here-just for a visual demonstration
   * It is better to fetch via event.pageMounted or reflect
   */
    useEffect(() => taskModel.getTaskByIdFx({ taskId }), [taskId]);

    // You can transfer part of the logic to entity/task/card (as a container)
    if (!task && !isLoading) {
        return ...
    }

    return (
        <Layout className={styles.root}>
            <Layout.Content className={styles.content}>
                <TaskCard
                    data={task}
                    size="default"
                    loading={isLoading}
                    className={styles.card}
                    bodyStyle={{ height: 400 }}
                    extra={<Link to="/">Back to TasksList</Link>}
                    actions={[
                        <ToggleTask key="toggle" taskId={taskId} />
                    ]}
                />
            </Layout.Content>
        </Layout>
    )
};
2.7 What's next?
And then new tasks arrive, new requirements are identified
At the same time, the old code base does not require significant rework
Has the functionality tied to the user appeared?
=> Adding entities/user
Did you need to change the filtering logic?
=> Changing the processing at the entities or pages level, depending on the scale
Do you need to add more features to the task card, but at the same time, so that it can be used in the old way?
=> Add features and insert them into the card only on the desired page
Has a module become too complex to support?
=> Thanks to the embedded architecture, we can only factor this module in isolation-without implicit side effects for others (and even rewrite it from scratch)
Summary
We have learned how to apply the methodology for basic cases
Obviously, the world is much more complicated, but now we have already caught on to some controversial points and resolved them in such a way that the project remains supported and extensible.
We got a scalable and flexible codebase
-
Reused and expandable modules
- shared, features, entities
-
Uniform and predictable distribution of logic
- Since the composition goes in the same direction (the overlying layers use the underlying ones) , we can predictably track and modify it without fear of unforeseen consequences
-
The structure of the application, which tells about the business logic for itself
- What pages are there?
TasksList,TaskDetails
- What features are there? What can the user do?
ToggleTaskTasksFilters
- What are the business entities? What is the work being done with?
Task (TaskCard, ...)
- What can be reused from the auxiliary?
UIKit (Card, ...)API (tasksApi)
- What pages are there?
Example
Below in Codesandbox is an example of the resulting TodoApp, where you can study in detail the final structure of the application
See also
- (Overview) How to Organize Your React + Redux Codebase
- Analysis of several approaches to structuring React projects
- Guides and examples of the methodology application (+ Migration from v1)
- Reference material on the methodology